Thursday, December 31

Final 2015 project

Today I have my very last project for the year to share with you. I have one more Coffee Talk project from Heartfelt Creations before a new collection for the year is released next week. 

 The coffee mug stamp and die make an awesome stand alone card (see Emma Lou's how to video here: https://www.heartfeltcreations.us/collections.php?c=2015-december-coffeetalk ), and you can see some additional examples using this technique from other DT members on the blog, but I wanted to do something a little different with it, so I have created a card on top of a card.  


I created a top folding cup shaped card as per Emma Lou's instructions, but then I mounted it onto a second tent style card. I imagine that the front card would be great for housing a gift card. 


Be sure to check out the blog for a sneak peek of the new Sugar Hollow collection. I have been working with it all week, and it is so incredibly cute, and there are heaps of co-ordinating dies to this collection for all the sweet little owls. 


Saturday, December 26

Merry Christmas with Ruby Rock-It |Alicia Barry|


Today I have used a combination of the Hearts and Strips range and the Dancette collection to create a festive layout. 

By using the back side of the Hearts and stripes paper I created a more muted background, so that the glitter of the Dancette would stand out, rather than over power the layout. This also meant that the glitter letters I used from the  Happy Days collection would also be a focus point, not a distraction. 


I coated the background cardstock in gesso, and sprinkled with superfine glitter first. I used a heat tool to set the background, making sure that I used extra heat on the thick parts. This made it bubble up which added nice texture to the background, again without adding extra clutter. 


I added twine and dimensional paint dots to glitter circles to create simple ornaments. 


Supplies used:


Wednesday, December 23

Warm up with Heartfelt Creations

It's almost Christmas, but that doesn't stop us from sharing our latest projects from Heartfelt Creations, For my latest Heartfelt Creations project, I have altered a coffee sleeve using the latest release Coffee Talk. 

I used one of the new border dies to create a ruffled edge, and used the dies from the collection with the printed images in the paper collection for a quick and easy project. 


All the instructions are on the blog as always along with lots of great projects from my fellow designers. Not long until the next collection will be released for CHA. 


Wednesday, December 16

Coffee Talk with Heartfelt Creations.

It's Wednesday again, so that means I can share my latest Heartfelt Creations project with you. I love playing with card folds that are a bit different to the norm, so I created this flap fold card. These have been around for a while, and they are such a cute idea. 

I was very keen to experiment with the new border dies as a way to go a little off this page with this design.  I really like how it turned out. The border essentials is a really versatile set and a great addition to your collection. 


Check out the blog here to see and print project sheets for all the design team projects. 

Wednesday, December 9

Coffee Talk with Heartfelt Creations: A new collection


Today Heartfelt Creations is releasing the December collection called Coffee Talk. Anyone who knows me knows that I don't drink coffee (or any hot drinks), but I know plenty of people who do, so I was thinking of them as I created my projects this month.


Here's a bit more about the collection:

It's the beverage that starts our mornings, chases our mid day slumps away, and in the evenings has us gather around the table to enjoy and partake in laughter and light hearted banter, to share treasured memories and deepest dreams and to encourage one another in meaningful friendships...and now we invite you to our table to warm your hands, hearts and souls with the fresh brewed designs of the Coffee Talk Collection by Heartfelt Creations!  Capture and relive those precious moments spent around the kitchen table, or favorite cafe with family and friends shared over the simple pleasure of a cup of  coffee, latte, or cappuccino.  The charming and delightful illustrations of coffee mugs, barista style chalkboard  sentiments and gorgeous patterns in variations of blues, creams and mochas are the perfect blend to get your creative senses percolating, and will allow you to espresso your style perfectly!  The delectable card fronts and dreamy patterned scrapbook pages are splendid for sending well wishes or for displaying those fun and silly selfies taken in the back corner of your favorite coffee shop with your inner circle of friends!  Whether you enjoy your cuppa java black, with cream, milk or sugar, instant or made from freshly ground coffee beans, the Coffee Talk Collection will provide you with the perfect fusion of flavors for all of your paper crafting concoctions. 

Here is my first project with this collection:


This is a centre opening card, but I added to the left side of the flap to make it look like it was more like a trifold. I used the cute coffee stain sentiment stamp on this one, along with one of the new border dies. 

There are some really great projects on the blog from he design team, be sure to check them out here.


Wednesday, December 2

Moments with you card for Heartfelt Creations.

I hope that lots of you got the opportunity last Friday to check out the live stream from the Heartfelt Creations Design Room. This was the first time ever that they have done this,  while at the same time releasing a brand new collection of flip fold albums. This albums are so much fin to play with. If you were not able to catch the live stream, you can watch the recorded video here: https://www.youtube.com/watch?v=pA1mc2H42oo.


Also on the video, and on the blog today is a sneak peek of the next collection called Coffee Talk, that is releasing on the 9th of December. You can see it here: https://www.heartfeltcreations.us/collections.php?c=2015-december-coffeetalk

Meanwhile, here is my share for this week. I have created a multi layered card using the All Glammed Up collection.  I have layered a small show image over the one already in the printed image to make it look more dimensional, then decorated with with watercolours and paint. 


Check out the blog today for a really nice shoe shaped gift box using the large show die from the collection made by Candy Slabaugh.

Saturday, November 28

Flip Fold album with Heartfelt Creations.

Yesterday on the Heartfelt Creations blog, Emma Lou hosted a live stream from the design room where she released the brand new flip fold albums and inserts, and storage. These album are awesome, but I can see how they may seem a bit overwhelming for some at first glance, so I am sharing heaps of photos of the first one I have created, to hopefully give you lots of ideas. 

I have to admit, when I first opened up the packets, I was at a bit of a loss as to where to start. simply because there are so many options, which is really what you want to see in a new product, but it does make it tricky to know where to start.

Here's a bit of a run down of how I approached this, but of course this doest;t mean you have to do it this way. Once you get a roll happening, you really will love making these albums. I can't wait to get a start on my next one. 

The process:
1. I knew that I wanted to line each of the pages as well as the cover, and I had the idea of the belly band  for the cover straight away, so knowing that this would use up the biggest pieces of paper, I started there, to make sure I wouldn't run out. I measured up the covers first, then the pages. Remember that while the pages are all the same, the inside from and back cover are different measurements. I used double sided tape for the papers, so that I could go back and lift up some of the edges to tuck in the hinges of some of the pockets.

2. I made sure I saved the sentiment and decorative strips so that I could use those in the spine between each of the pages. At this point, I also set aside time to make my belly band. You can see detailed instructions for that over on the Heartfelt Creations blog. 

3. I went through all of the flip folds and pockets and folded them up to see how they would look, and   started to plan out where they would go in the album. I used some reposition able tape to hold them in place. 

4.  I went through and started measuring and cutting. (hint:  measure all your panels in one go and write the measurement on the card base. It will be covered in paper anyway, and saves a lot of time). Starting again with the biggest panels, I started cutting and pasting all the panels in place. Keep in mind this is where you will want to die cut any of the flaps. You can see how Emma Lou did that in the stream from yesterday. Keep in mind also where you want to add a magnet to help everything stay closed. I used a bottle cap magnet on one side and a small washer on the other, adhered under the paper. Remember to check that you don't have too many layers for the mange to work through.

5. With the panels now covered, I went and adhered them in place, lifting the large panels and resticking where necessary. I also die cut lots of borders. 

6. Now I made lots of leaves and flowers all in one go. I have a big box of them on my desk. I went all assembly line and made stacks, dipping many of the centres in Gala Glitz. Once dry, I went through and embellished all the while going back and checking that the album wasn't getting too bulky to close. 

This one has now gone off to head office, so I chose not to add photos this time, but hope to next time around.

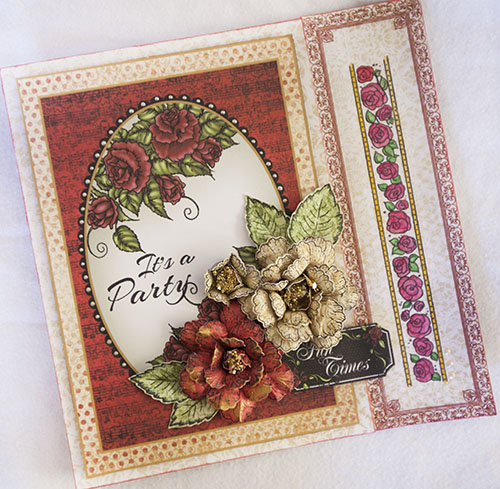
So now some photos, starting wth the front cover: 
The band closes with a magnet. 


The spine


 Inside front cover and page 1. I used a corner die to create a pocket and more of the border dies to made large decorative tags, which both pull out. 


 The second page has a pull out mini album, with a pocket for memorabilia or just to slide a photo into. I used a mix of small panels and plain background paper to cover each page. The panels add extra printed embellishment without adding more bulk. 


 Page 3 has small pull out tags and an envelop at the top 


 Page 4 is a full size open out album. I used a border die from the December collection to create a band down the front of the album, that a photo could be slipped into. 


Page 5 has a small flip out mini book, plus a decorative matt at the bottom. 

   Page 6 is a single open pout flap with a double pocket. The printed square panels in the patterned paper fit this perfectly. 


Page 7 is a fold out book with pockets at the top and bottom. 

  Page 8 is a cascade pull out. I sed the same paper across the panels for a cohesive flow.


Page 9 opens out with a hidden pocket underneath, and a library envelope pocket on the top with a decorative tag.  Opposite is a trifold card fold out.


Inside the back cover is a pair of cascade fold outs. I used the small decorative corner as an accent under the album corner. I used one of the new border dies to create an extra decorative pull out on the back cover. 


Some of the flip folds do look a bit confusing at first glance, so be sure to check the blog and save photos of the albums that the team is sharing, so you can see how they look all made up and decorated. I find that a far easier way to work out how they go. Most of the team will also have heaps more photos on the blogs, so please do take the time to go and take a look. Some also have videos to go with them. 

I have more photos but didn't want to go to crazy, if there is something you want to see or have explained in more detail, please leave a comment and I will get back to you. 

I hope this has inspired you to have a go at making one of these albums. I won't lie, it is time consuming, but I think it is well worth it. 


Monday, November 23

Exciting things happening at Heartfelt Creations.

Before I show you my project for this week, let me tell you all about a special event happening at Heartfelt Creations. This week, on Black Friday, Emma Lou, the creative director, will be hosting a live stream on the You Tube channel at 1pm EST. This in itself should be fun, but what you really want to be there for is the release of a brand new line of products. 

We designers have been working with these products for the last little while, and I can't even tell you how excited everyone has been putting these together I can't really tell you much more than that without getting into big trouble, but if you check out the blog this week, and watch Emma Lou's video, you will get a pretty good sneak peek. 

In the meantime, I have a new card to share using the All Glammed Up collection.  Just like last week, I have really liked making some new roses to go with this collection, and am loving playing with the Gala Glitz. I need to get this in every colour! I love that you can make a really elegant and different looking rose using this stuff. 


For those of you from home in Australia who love Heartfelt Creations too, you might be interested in a Facebook group called Heartfelt Creators with Heartfelt Creations. I'm not sure how this group came about, it is not run by HFC or the Design Team, but us designers, as well as some of the in-house team do drop by from time to time. It is a great place for Heartfelt customers to share projects they have created using HFC products and a good way to source the products in Australia. Check it out here: https://www.facebook.com/groups/1709905832563720/


Friday, November 13

Beyond the page with Ruby Rock-It |Alicia Barry|


This year,  I am excited to have some friends coming over for a Thanksgiving dinner with a bit of an Australian twist (Turkey dinner with pavlova desert among other things...and yes I know that pavlova is technically Kiwi). 

I have been having fun getting on board with the American traditions, using my Ruby Rock-It supplies to help me out. 


This is just one one place setting for our meal. I can't wait to see the entire table all set.

These paper pumpkins are certainly nothing new, but I was excited to see how one would look made from the new Hearts and Stripes range.  I also paired this with some glittered paper from the Dancette range. 

I hand drew the leaves to co-ordinate with the pumpkin, and made a matching utensil pocket from a brown paper lunch bag. I used twine from Maya Rd on both projects along with tired paper strips to simulate the tendrils on the pumpkin vine 


Ruby Rock-It Supplies:


Wednesday, November 11

All Glammed Up with Heartfelt Creations

This week is time for another wonderful new release from Heartfelt Creations. This collection is called All Glammed Up. 

Cue the spotlight and roll out the red carpet because the new All Glammed Up Collection by Heartfelt Creations has arrived! This ultra feminine compilation of glamorous flowing gowns, lavishly flower filled heels and stunning rose accents all showcased in elegant tones of reds, blacks and golds are the perfect combination for any stylish celebration and are sure to have your magnificent paper crafts taking centre stage and dominating the runway! Modern patterns and motifs mixed with eclectic and vintage style lend the perfect blend to any masterpiece whether you wish to dress your project up or down.  The grand and regal footwear illustrations coupled with the complementing dies are perfect to create that specialty shaped invitation for a special bridal shower or girls night out. The wide array of sentiment stamps included in the collection are ideal to have on hand for a variety of occasions, while the gracefully detailed and lace like gown and floral sprays and accents are sure to bring that extra touch of splendor to all of your layouts, cards or altered art projects.  So channel you inner fashionista, gather your finest glitters, rhinestones, ribbons and laces and join us in celebrating life's beautiful moments with this stylish, timeless and classy collection.  


Here's my first project with this pretty and elegant collection.  At first I wasn't sure that the show image was for me, but once I started playing with this collection,  it has become one of my favourites. The colours are so nice, and the shoe is actually a lot of fun to play with...but more on that in my project for next week. This week, I have focussed on the flowers in the collection, and made the roses really elegant by adding Gala Glitz to it. (Available here)


This card is a flap fold card, the left side opens, but the decorative border on the right does not. I got myself some new watercolour pencils that I used to colour the image. 


As always check out the blog for lots of great samples, and another excellent video tutorial from Emma Lou, where you can see this collection in more details, and find out about something exciting happening for Black Friday here in the States. 

Thursday, November 5

Heartfelt Creations- a double share.

The good news is that our stuff has finally arrived from Australia. It arrived last week, and with Michael working away, I am still unpacking and sorting out where everything will go. I haven't even had a chance to plug my computer in yet (lucky for the laptop), so needless to say I have not blogged this week, so today I am taking a 5 minute break to do a double share for you.

These are the last of my Italiana Riviera projects (for now :)) before a new collection is revealed next week.

First up, is a card that I am really pleased with. I really love the delicate border die that comes with this collection. This is a double flap card. You can get the full instructions for this over on the Heartfelt Creations blog.


Next up is a card with a very detailed vineyard image that I played with using some new watercolour pencils. This is one of my favourite ways to add colour. Ive used the same die again to create some extra detail on the top of my card. 


There are a couple of great off the page projects on the blog from some of the other designers this week, make sure you check them out, and don't forget the you can print project sheets straight from the blog.