Wednesday, October 21

Heartfelt Wednesday

For my Heartfelt Creations project I have made a layout using a picture from a visit to Napa Valley a couple of years ago. I don't actually drink wine, so some of the wine bottle images don't really suit the story from our photos, but the colours in this collection are just perfect. I also enjoyed making the roses to adorn this layout.


For the rose, I have added extra dark purple ink along the edges of the petals, then sprinkled them with clear glass glitter. I can;t wait for our camera to come in the shipping container, so that I can get clearer pictures of my work.  You'll have to take my word for it, the roses look so much better in real life. 


I also added Glossy accents to the grapes in the images to make them a little more life like.  By the way the vines leaves that come in this collection are awesome and really versatile. Such a good size too ( in fact there a a few different sizes). 


As always, check out all the great stuff from the Design Team over on the blog. Check out the card that Susan Smit made, it is so beautiful.

Monday, October 19

Maya Rd and Ruby Rock- It Swap


At Ruby Rock -It we are very lucky to have the opportunity to partner up with other companies from time to time, and this month, we have been doing a bit of a swap with Maya Rd. They have such cute little trinkets, and off the page projects, and their products go really well with Ruby Rock-It collections. For Ruby Rock-It we are also showcasing the new mini collections that are now available. 

Today I have combined a Maya Rd shadow box with the Girl mini theme to create this little decoration to hang on Amelie's wall of her room in our new house. 


I started by painting the shadow box white. The shadow box comes with chipboard inserts for each of the windows which is so clever. It made it really easy to line each of the windows. No measuring or anything, I just covered the inserts with patterned paper and adhered them with foam dots. 


I used a combination of patterned paper, die cuts and 3Ds stickers to create the main title block.


Love the cute little owl embellishment from Maya Rd.


I used a couple of Bella! florals to bulk up the floral die cuts. 


The butterfly is my favourite part. I have layered two die cuts with an acetate butterfly from Maya Rd. I used lots of foam dots between the layers, and especially on the bottom to really lift it up high.


I also created a banner across the bottom using foam dots, 3D stickers and twine from Maya Rd. Since the twine is made from raffia, I unravelled some of it to make co-ordinating paper ribbons. 

Supplies used:


Wednesday, October 14

Sharing the new Italiana Riviera collection.

It is new collection day at Heartfelt Creations, and today I have a card to share with you using this awesome range called Italiana Riviera.

It's time to slow down the daily pace, take a deep breath and embrace life with the new Heartfelt Creations Italiana Riviera Collection.  We invite you to stroll down the Italian coastline taking in the spectacular seaside views, open markets, and amazing architecture while allowing yourself to relax and get lost in an easy going way of life.  Feel the gentle breeze, breathe in the aromas of salty mist and mouthwatering eats as you pass by a harbour lined with delightful cafes and quaint little shops calling out to you to pause for a visit. Step through towering stone gates to meander through perfectly manicured vineyards boasting rows and rows of coiling vines filled with dense foliage and  plump clusters of exquisitely purple hued grapes.  Then as the sun sets, continue to take in the old world charm and beauty of the area as you relax in your villa, enjoying a glass of fine wine aged to perfection while jotting down all of the days wonderful adventures on an old fashioned postcard, pausing occasionally only to peer out the old stone window that reveals the most surreal view of lush gardens, stately mountains, beautiful flowers and that perfectly manicured vineyard.  At Heartfelt Creations we dismiss the misconceived notion that you are required to leave your craft room to experience the finer things in life...so come along with us as we invite you to explore the charm and elegance of the Italiana Riviera Collection!


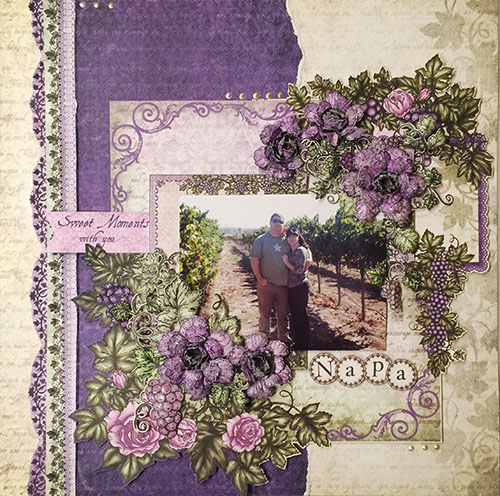
Here is my favourite part of this new collection. I do love that it is purple, which would normally be my favourite part, but check out this gorgeous border die that comes with it! It comes in two parts meaning that you can cut the intricate die in one colour, and then a background in another, or both the same as I have done for my project this week, which I think creates a really elegant look. This would be so nice in metallic yardstick on wedding invitations. 


There is no flower stamp and die with this collection, so I have created these cabbage roses uses the Botanical Wings set. 


So many beautiful projects on the blog this week. Be sure to check them out, along with a video from Emma Lou with some tips on how best to cut the border die that I have used here. 


Wednesday, October 7

Mum Bouquet

This week for my Heartfelt Creations project, I decided to try something a little different. I haven't done a card or a layout, but instead wanted to really focus on the pretty flowers that are a part of this collection. I have recently made some silk flower arrangements for fall for my house, and decided I could make something similar using just paper. 


For this bouquet, I have made 10 full sized flowers. As opposed to the close shaped Mums I have previously made with this stamp and die collection, I decided to reverse the shape of the petals, to create a far more open flower. Some dark glass glitter in the flower centres, made these more of a gerbera shape.  I used the same petal in green to line the base of each flower, and used a trimmed down stamp and die image for the leaves. 


Meanwhile, have you checked out the work that Penny O'Dell has done for the blog. She has been using the same die set to create clay jewellery. So clever!

Thursday, October 1

Enchanted Heartfelt Share!

Today I have another project to share with you using Enchanted Mums from Heartfelt Creations. You can see this and lots more awesome stuff over on the blog today as well as a little preview of the next collection that will be out soon. Be sure to check out the way that Liz Walker has created sunflowers using the Enchanted Mums die. 

Meanwhile, here's what I came up with this week. Of course if you would like to make the card, you only need to click the little print icon on the Heartfelt Blog to get print up a project sheet. 


Thanks for looking.