Tuesday, December 26

A brand new year with Ruby Rock-It


So Christmas is over and it is time to look forward to a new year. In my house, I find that kids being kids, they get so excited about  what they want, that they don't always take the time to reflect on how lucky they are to have all the things in their life that maybe other people don't. 


This coming year, I want to change the focus in our house to being more aware of how fortunate we are, and to be grateful for that, so I have created this memory jar.  The idea is that as good things happen throughout the year, they write it on a piece of paper and add it to the jar. At the end of the year, they read about all the good things in their life and with a bit of luck, be grateful for what they have.


I started with a simple mason jar, and painted on some mod podge around the base. I sprinkled a combination of pink and white glitter, and also added in some pink micro beads.  I used a heat tool to make sure it was set. I also used the same method to add a coat of glitter around the edge of the lid.


I then created a label with some die cut shapes layered together. I used Ranger Distress Ink in Pickled Raspberry to lightly ink the edges. I used the same die cut on the top of the jar, and added a Fundamentals doily shape over the top. (I only had green left in my packet, so I glued it upside down to show to the white side.


I then added white ribbon, a small white flower and wood veneer stars to embellish.


Supplies used:
Francheville glitter


Friday, December 22

Santa mini sleigh with Gypsy Soul Laser Cuts

5 Gypsy Soul Laser Cuts · Post Mini Christmas Sleigh Ornament Posting as Alicia Barry Update Revert to draft Preview Close ComposeHTML Link
It is so close to Christmas, yet I still find myself making new things. If you've been to my blog, you'll see that I have made quite a few new home decor items this year all in my teal, gold and silver colour scheme. Today I am sharing this super cute Gypsy Soul Laser Cuts mini sleigh. 


I love all things mini and this is super cute. It's very small, only around 5-6 inches long, yet still has beautifully delicate details. This means that I really didn't have to do much to it, to create a really sweet little ornament. 


Being small makes it a perfect size for a Christmas village display, or a tree ornament.  If I had a whole group of these, I would pop a small stick in there with a name tag to make a very unique table place card decoration. Imagine one of these on each plate! Maybe that will be my goal for next year. 


The sleigh itself slots together very easily. I assembled first today, then coated in gesso. I left the decorative pieces separate. I painted the sleigh in teal paint and allowed to dry. In the meantime, I covered the gesso coated decorative pieces in liquid adhesive (I used embossing glue in a dauber bottle) then sprinkled very fine glitter. I then adhered in place to the sides of the sleigh. 


I then added a teal coloured ribbon bow, and piled in some mini pinecones and mini ornament balls. You could hot glue these in place if you were to hang it on the tree. That's really all there is to it. I almost feel guilty about how simple this project is, but that makes it a perfect project to try at home. It proves that not everything has to be overly complicated to look great. 


Supplies used:

Post settings Labels Alicia Barry, Christmas, mini sleigh Published on 12/22/17, 1:00 AM Central Standard Time Permalink Location Options

Thursday, December 14

Santa Sleigh table decoration with Ruby Rock-It


A few weeks ago, I created a hanging pinecone wreath to add to my Christmas display. You can see it here. 


Today, I have created a Santa Sleigh table centrepiece to match. I bought this timber sleigh at the goodwill store for $4. It is quite large, about 18 inches long at least. It wasn't bad as it was, but it does have a corner that has been broken off and re-glued (quite badly), plus it is in traditional green. This wasn't going to work with my colour scheme.

First step was to clean it down, and prime it with a coat of white spray paint, paying particular attention to the surfaces that I didn't plan to recover. 

I then traced out the sides onto the back of my gltiz cardstock. Both sides are obviously the same, I only needed to trace once, then cut a mirror image version. The sides are very large, so I needed to use two sheets for each side, with a seam, but that was then disguised. I choose to use a separate colour for the blades of the sleigh.

I used hot glue to adhere the papers, since they are heavier than regular cardstock. 

 Once that was done, it was just a matter of decorating. I put some florist foam blocks into the bottom, both to create some height and also to have something to anchor the branches into. I have used real Christmas tree branches. I simply went to the Home Depot and asked for the offcuts from the tree trimming. (I also use these the bulk up my banister garland). For those of you back home in Australia, sorry, I guess you will have to stick with artificial garland. At this point I also tucked in a strand of battery powered string lights, so it will sparkle in the night time.


I positioned my candles, which I embellished with pieces of leftover glitz cardstock. I trimmed the branches into manageable pieces and tucked into the foam, so that they would surround the candles. Be sure to allow plenty of space for the wick if you are using real candles.


Next, I tucked in some pinecones that we collected from the park. and tucked some large silk flowers into the foliage. I took some squares of deco mesh, and rolled them on the diagonal, and tucked them in at random places to add some colour.  I also added some small silver baubles.


You may find you need to tweak things a little to have the arrangement looking just right, by honestly, this is a sophisticated project, that was actually deceptively simple to put together. 

Supplies used:


Monday, December 11

Christmas Lantern with Gypsy Soul Laser Cuts

I love decorating for the holidays. It is one of my favorite things to do. This year, I have been adding some handmade pieces to my collection. I recently created an Advent Calendar, which you can see here.  I have made a pinecone wreath and I am working on a Santa sleigh table decoration.  This week, I have created a pretty little lantern post decoration.

I started with the Gypsy Soul Industrial Lantern kit.


I covered the whole thing in black gesso. You will need to paint the inside as well, since you can see straight through the sides. I found it easier to do this first, before assembling. 


I wanted my lantern to stand upright as a table decoration, so I created a stem from rolled up cardboard (paper town inner), and covered in black cardstock. I cut flaps into the top and hot glued it to lantern base, which I also covered in black gesso.  I then stuck the stem into a floral foam base, covered in black cardstock. I painted the top of the foam in black gesso too. 


Next, I wanted to create a decorative base for the lantern, so I layered two circular chipboard pieces. I covered them in white gesso, then glitter. Notice how I have used slightly different glitter on each piece, so they would stand out from each other, while still having a cohesive look. I adhered them with a thick layer of hotglue, to give a little dimension between the layers. I backed the base in black cardstock, to have a surface to adhere the lantern to.


I wanted to mimick the delicate design on the base, at the bottom of the layer, so I used a Wrought Iron border piece in a similar design, and just cut it to fit each side.


Then it was time to decorate. I applied texture paste with fine glitter to mimic snow, then embellished with tiny pinecones, flowers, leaves and some ribbon.


This lantern is the perfect size for a tiny battery operated tea light.


Supplies used:

Tuesday, December 5

Pinecone Wreath with Ruby Rock-It


Thanksgiving is finished here in The States, which means I have the official go-ahead to do all things Christmas. A few years ago, I changed up my theme to blue, silver and gold. The tree is under control and I am gradually adding new items to decorate my house. I've been meaning to make this for about two years now. Finally I got to it.

Today, I have used some new Francheville fine glitter to create a wreath for my front door. This is super cheap to make, as the kids and I collected the pinecones from the park on the way to school. Try to choose some that still have a bit of the stem attached, as it makes attaching the ribbon a little easier. A little tip, if you are planning to give this a go with real found pinecones like we did, bake them in the oven for a while first, to make sure there is nothing living inside there. It makes them smell nice too.


To start, I sprayed with a little white paint to help the glitter to show up more brightly. I didn't use a lot and wasn't trying to cover the whole thing. I still wanted the natural colour to show through from the bottom.


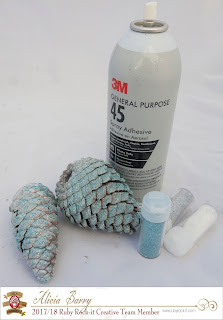
 Once dry, I sprayed with spray adhesive. The glitter bottles come with two sides. A sprinkling side and a pouring side. I didn't want to over do it, so I just used the sprinkling side. I used a combination of three colours of glitter. Be sure to place a piece of paper under you to catch the excess, and then use that for the next pinecone. I only used a bout a third of each bottle to make this entire project. A little goes a long way. Hold the pinecone from the top when you sprinkle, so you don't waste the glitter by it falling to the inside of the pinecone.


I used some of the same ribbon that I use on my Christmas tree to create a three layered bow at the top with a white ribbon loop. The flower are foliage area a pick from the craft store. I also use these on my tree so that everything matches.  I thread some long loops of ribbon through the back of the bow.


I adhered the ends of the ribbon to the tops of the pinecones using hot glue, and finished with a bow. For a large heavy pinecone like this, I adhered a small light one on the opposite end of the loop . I could also adjust these loops so that the pinecones all hung at different heights. 


The finished project on my front door.


Stay tuned for my next project, which is a large wooden Santa sleigh centrepiece that will also match this. 


Supplies used:
Francheville glitter


Monday, November 27

Advent Calendar

So Thanksgiving is over and I hope everyone had a wonderful day. Now it is all about Christmas. This is a big deal in our house. I love to decorate. I have created this Advent Calendar Shadowbox to fit in with my tree decor. My tree is aqua with gold and silver. Not so traditional.


The Advent calendar kit will give you the structure of the shadow box, including a template for the boxes. You can also purchase the Pre-cut Drawers separately. This will save you a lot of time. You simply fold along the score lines, glue the tabs and you're done.


I chose to cover mine with paper. It was as simple as cutting strips and wrapping around. For the notch in the front, I covered two of the sides, starting at the back, then traced the inside of the notch and cut with scissors before adhering the last two sides. I found it important to glue those two sides first, as it allowed me to place the notch perfectly. Of course, you could just paint the boxes too. Whatever you use, keep it simple and adhere closely, as the spots for the boxes to slide into are tight.


For this project, I chose to assemble and adhere my shadow box into place before painting. I knew I would be covering most of the surfaces with paper, and that the insides wont be seen at all, so the only surface I really needed to worry about are the forward facing edges. A quick spray with metallic paint mists was sufficient, and far quicker than painting. Don't worry about the overspray, it will be covered.


I then slotted my boxes into place and lined the inside of the shadow box with decorative paper. 


At this point, I also added metallic numbers to the front of the boxes using foam dots. By raising them, they act as little handles.


Next I took some Art Deco Borders and Corners and covered with white gesso and fine glitter. I wanted them to look snowy. I adhered these in place as shown, making sure that the boxes could still slide out easily.


I decorated the inside corner of the shadow box with a lamp post image from the Christmas Shape Set, layering a wreath and bow over the top. These also had glitter added. I used a little texture paste with more glitter to resemble snow. The base of the shadow box has some batting glued in place. A tiny drop of dimensional paint resembles the flame.


I then added some small pinecones and foliage along with a small Christmas ornament. (I recommend using a hot glue gun at this point). This all has texture paste and glitter over the top.


In the top corner, I have hung some more snow covered Christmas balls.


And on the very top of the box, I have created another cluster to mirror the one on the bottom.


Now to find some tiny treats to fill all those boxes ready for the start of December.


Supplies used:

My Mind's Eye papers
Embroidery thread
Lindy's Stamp Gang paint mists
Ranger distress ink
Silks paint
Francheville fine glitter
Ranger dimensional paint
Foilage
Post settings Labels Advent Calendar, Alicia Barry, Art Deco Border & Corners, christmas shape set, pre-cut drawers, shadowbox Published on 11/24/17, 1:00 AM Central Standard Time Permalink Location Options