Wednesday, October 21

Heartfelt Wednesday

For my Heartfelt Creations project I have made a layout using a picture from a visit to Napa Valley a couple of years ago. I don't actually drink wine, so some of the wine bottle images don't really suit the story from our photos, but the colours in this collection are just perfect. I also enjoyed making the roses to adorn this layout.
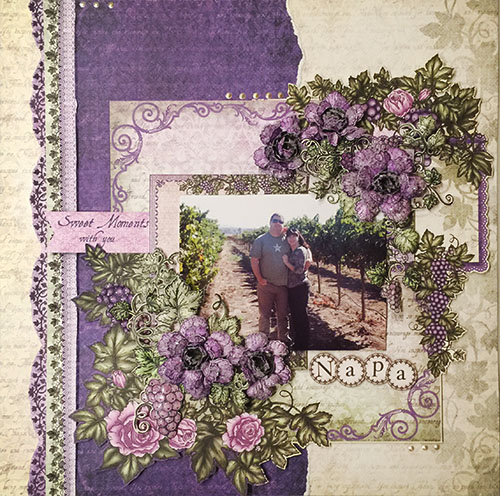

For the rose, I have added extra dark purple ink along the edges of the petals, then sprinkled them with clear glass glitter. I can;t wait for our camera to come in the shipping container, so that I can get clearer pictures of my work.  You'll have to take my word for it, the roses look so much better in real life. 


I also added Glossy accents to the grapes in the images to make them a little more life like.  By the way the vines leaves that come in this collection are awesome and really versatile. Such a good size too ( in fact there a a few different sizes). 


As always, check out all the great stuff from the Design Team over on the blog. Check out the card that Susan Smit made, it is so beautiful.

Monday, October 19

Maya Rd and Ruby Rock- It Swap


At Ruby Rock -It we are very lucky to have the opportunity to partner up with other companies from time to time, and this month, we have been doing a bit of a swap with Maya Rd. They have such cute little trinkets, and off the page projects, and their products go really well with Ruby Rock-It collections. For Ruby Rock-It we are also showcasing the new mini collections that are now available. 

Today I have combined a Maya Rd shadow box with the Girl mini theme to create this little decoration to hang on Amelie's wall of her room in our new house. 


I started by painting the shadow box white. The shadow box comes with chipboard inserts for each of the windows which is so clever. It made it really easy to line each of the windows. No measuring or anything, I just covered the inserts with patterned paper and adhered them with foam dots. 


I used a combination of patterned paper, die cuts and 3Ds stickers to create the main title block.


Love the cute little owl embellishment from Maya Rd.


I used a couple of Bella! florals to bulk up the floral die cuts. 


The butterfly is my favourite part. I have layered two die cuts with an acetate butterfly from Maya Rd. I used lots of foam dots between the layers, and especially on the bottom to really lift it up high.


I also created a banner across the bottom using foam dots, 3D stickers and twine from Maya Rd. Since the twine is made from raffia, I unravelled some of it to make co-ordinating paper ribbons. 

Supplies used:


Wednesday, October 14

Sharing the new Italiana Riviera collection.

It is new collection day at Heartfelt Creations, and today I have a card to share with you using this awesome range called Italiana Riviera.

It's time to slow down the daily pace, take a deep breath and embrace life with the new Heartfelt Creations Italiana Riviera Collection.  We invite you to stroll down the Italian coastline taking in the spectacular seaside views, open markets, and amazing architecture while allowing yourself to relax and get lost in an easy going way of life.  Feel the gentle breeze, breathe in the aromas of salty mist and mouthwatering eats as you pass by a harbour lined with delightful cafes and quaint little shops calling out to you to pause for a visit. Step through towering stone gates to meander through perfectly manicured vineyards boasting rows and rows of coiling vines filled with dense foliage and  plump clusters of exquisitely purple hued grapes.  Then as the sun sets, continue to take in the old world charm and beauty of the area as you relax in your villa, enjoying a glass of fine wine aged to perfection while jotting down all of the days wonderful adventures on an old fashioned postcard, pausing occasionally only to peer out the old stone window that reveals the most surreal view of lush gardens, stately mountains, beautiful flowers and that perfectly manicured vineyard.  At Heartfelt Creations we dismiss the misconceived notion that you are required to leave your craft room to experience the finer things in life...so come along with us as we invite you to explore the charm and elegance of the Italiana Riviera Collection!


Here is my favourite part of this new collection. I do love that it is purple, which would normally be my favourite part, but check out this gorgeous border die that comes with it! It comes in two parts meaning that you can cut the intricate die in one colour, and then a background in another, or both the same as I have done for my project this week, which I think creates a really elegant look. This would be so nice in metallic yardstick on wedding invitations. 


There is no flower stamp and die with this collection, so I have created these cabbage roses uses the Botanical Wings set. 


So many beautiful projects on the blog this week. Be sure to check them out, along with a video from Emma Lou with some tips on how best to cut the border die that I have used here. 


Wednesday, October 7

Mum Bouquet

This week for my Heartfelt Creations project, I decided to try something a little different. I haven't done a card or a layout, but instead wanted to really focus on the pretty flowers that are a part of this collection. I have recently made some silk flower arrangements for fall for my house, and decided I could make something similar using just paper. 


For this bouquet, I have made 10 full sized flowers. As opposed to the close shaped Mums I have previously made with this stamp and die collection, I decided to reverse the shape of the petals, to create a far more open flower. Some dark glass glitter in the flower centres, made these more of a gerbera shape.  I used the same petal in green to line the base of each flower, and used a trimmed down stamp and die image for the leaves. 


Meanwhile, have you checked out the work that Penny O'Dell has done for the blog. She has been using the same die set to create clay jewellery. So clever!

Thursday, October 1

Enchanted Heartfelt Share!

Today I have another project to share with you using Enchanted Mums from Heartfelt Creations. You can see this and lots more awesome stuff over on the blog today as well as a little preview of the next collection that will be out soon. Be sure to check out the way that Liz Walker has created sunflowers using the Enchanted Mums die. 

Meanwhile, here's what I came up with this week. Of course if you would like to make the card, you only need to click the little print icon on the Heartfelt Blog to get print up a project sheet. 


Thanks for looking.


Monday, September 28

Monday Blues with Ruby Rock-It |Alicia Barry|


My family and I have just packed up and moved half way across the world from Australia to America. We arrived with just our suitcases, while the rest of our belongings will follow along in a shipping container. Thing is that will take at least 6 weeks to arrive. Meanwhile, we are living a bit of a camping lifestyle, with mattresses on the floor and camp chairs as our only furniture. 

This means no scrap desk, and no supplies, other than what I could stuff in my suitcase (yes, clothes were sacrificed for this).  

So, for my project today, I have gone back to basics. All I had to work on for this was the new Bella! Graduation mini kit, a sheet of cardstock, a pack of Gelatos and some white tissue paper. I did relent and get some Gesso when I got here (How good is Amazon same day delivery!!!).  


Here's what I came up with. I mixed some Gelatos with water and flicked it across the page to extend the spotted pattern in the paper. I created texture with tissue paper and Gesso, plus some untwisted twine. 


The rest of the layout was created with elements from the mini kit.


 Although this is a graduation kit, I was able to isolate certain elements from the kit and use it for a first day of school layout.


Thursday, September 24

Another Heartfelt Share

Today I am sharing a layout that I created using the Heartfelt Creations Enchanted Mums collection. Unfortunately my good camera is still en route from Australia, so I am having to make do with my photos. I really don't think this one does justice to these pretty papers. 


I have added glitter to the tips of all the petals of the flowers if you look closely. 


These Mums are quite a different petal shape to many other flowers, and it's been really interesting to see the Design Team shaping them in so many different ways, You can see some of them on the blog this week. While you are there, check out Robin's gift box. So beautiful.


Wednesday, September 16

Enchanted Heartfelt Creations share

It's Wednesday once again, and that means I can share my latest project using Heartfelt Creations which is live on the blog today.This month we are all making pretty Chrysanthemum flowers with the Enchanted Mums collection.


This is such a pretty collection, and was great to work with. This week I have a sweet little card to share. Using the largest petal layer, creates a lovely big flower that really makes an impact. 


For lots of ideas and inspiration, make sure you see the blog today for lots of projects. 


Sunday, September 13

Heartfelt Creations new release

As promised, I am posting this project from our new home in "sunny one day, foggy and freezing the next" San Francisco. We arrived safely and have been busy setting up our house and exploring the area. 

Even more exciting than that, is the fact that Heartfelt Creations has released a new collection this week. This one is called Enchanted Mums, and not only includes a great new flower, but also some super cute little dragonfly stamps and dies. 

Here's what the collection designer has had to say about this collection:

Swing open the decorative wrought iron gates and escape to serene and alluring garden surroundings with the Heartfelt Creations Enchanted Mum Collection.  Take in the beauty of shimmering dragonflies as they glide through warm and gentle breezes, landing to perch on beautiful bouquets of chrysanthemums dancing in the sunlight.  Graceful flowing floral images and exquisite die cuts along with soft hues of pinks, purples, greens and yellows are sure to bring about a sense of peace and calm to your soul.  Create your very own impeccable garden themed designs with the assortment of light and airy mums taking centre stage in five gloriously illustrated stamp sets along with swirling vines and beautifully detailed dragonflies, all of which mirror the stunning images found within this enchanting paper collection.  Create authentic, true to life blossoms and embellishments with three coordinating dies, perfect to grace your scrapbook layouts and original card creations.  Whether you are celebrating special occasions or  preserving precious family memories, an enchanting time of creativity awaits you with the Enchanting Mum Collection.  

And here is my first of many projects with this collection.

And of course, you already know to check out the work of all the other designers on the blog for heaps of other inspiration. 


Thursday, August 27

A Heartfelt Share

I am here sharing another Heartfelt Creations card with you today. As I do this, I am sitting in a house full of my life all bubble wrapped within an inch of it's life, as we prepare to move our family from Sunny Queensland, Australia, to Sunny California USA. 

I'm very lucky to work for a company like Heartfelt Creations who not only will allow me to work for them regardless of my geographic position, but has enabled me to make new friends in the States so I wont feel so alone when I get there. 

Meanwhile, there are still things to be done, and one of the great things I have to do is to share my latest project. This is another card using the Framer's Market collection. I taught a class using this collection last weekend, and the ladies really liked working with the jars. They agree thast while we all adore the Heartfelt Creations floral collections, it was fun to have something really different to play with. How sweet are these peaches (pun intended). 


Be sure to check out the blog for a sneak peek of the next collection "Enchanted Mums" and a video tutorial using the Christmas collection.